What's New in Easel
Pinned
Easel Generate
Easel Generate brings AI design generation into Easel. Describe the design you want and Easel creates it — as 2D vector artwork or as a 3D bas-relief — ready to bring into your project and carve.

How it Works
Choose your output
Open the design generator and choose 2D or 3D. 2D produces vector artwork for signs, silhouettes, icons, and line art. 3D produces a bas-relief along with the height map that makes it carvable.
The token cost is shown on the button before you generate, so you always know what an action will use — one token for a 2D design, two for a 3D design.
Describe your design
Write a prompt describing what you want: subject, style, and any details that matter. The more specific you are, the closer the first result will be. Bold shapes and designs with simple details can carve more easily than designs with a high degree of detail - factors to consider when crafting your prompt.
For 3D, you can also start from a reference image as well as a written description. Upload your artwork, logos, or photos and Easel Generate will turn them into reliefs.
.png)
Iterate until it's right
Generated designs may not exactly match your desired results in the first output. If a result is close but not quite there, you can refine your description and generate again — each iteration costs one token, and you can keep refining as long as you have tokens left.

Import and carve
When you have a design you like, select Import. It drops into your project where you can position, scale, and carve it like anything else in Easel.
3D reliefs can be exported as STL files on any plan. Carving a relief directly with Easel requires Easel Pro.
Tokens
Easel Generate runs on a monthly token allowance. Every generation and every iteration uses tokens, and your balance and reset date are shown on your Account page and inside the generator as you work.
Tokens refresh on your Easel Generate billing date each month. Unused tokens don't roll over. Run out of tokens and don’t want to wait? Simply upgrade your plan to re-up.
Getting Started
Easel Generate is a monthly subscription add-on, available to every maker including those on the free Easel Basics plan. Choose from Generate 30 ($8/month), Generate 60 ($12/month), or Generate 120 ($20/month), and change or cancel any time from your Account page.
Head to your Account page to add Easel Generate, or read the full documentation in our Support Center for prompt tips, token details, and troubleshooting.
Generate something, carve it, and share it in the Project Gallery — we'd love to see what you make.
Reach Out
Throughout the process of building Easel Generate, our team has identified a number of additional updates and enhancements that we plan to introduce over the coming weeks. As you use Easel Generate, share your feedback with our team to help us continue adding even more value into this powerful new tool.
September 2026
City Skyline App
Carve the skyline of your favorite city in a few clicks. The City Skyline app draws cities from their landmark towers, each seen from a real vantage point, and sizes the skyline to your material.
Open the app
Click Apps in the toolbar and choose City Skyline, or find it in the App Library under Featured.
Pick a city and a view
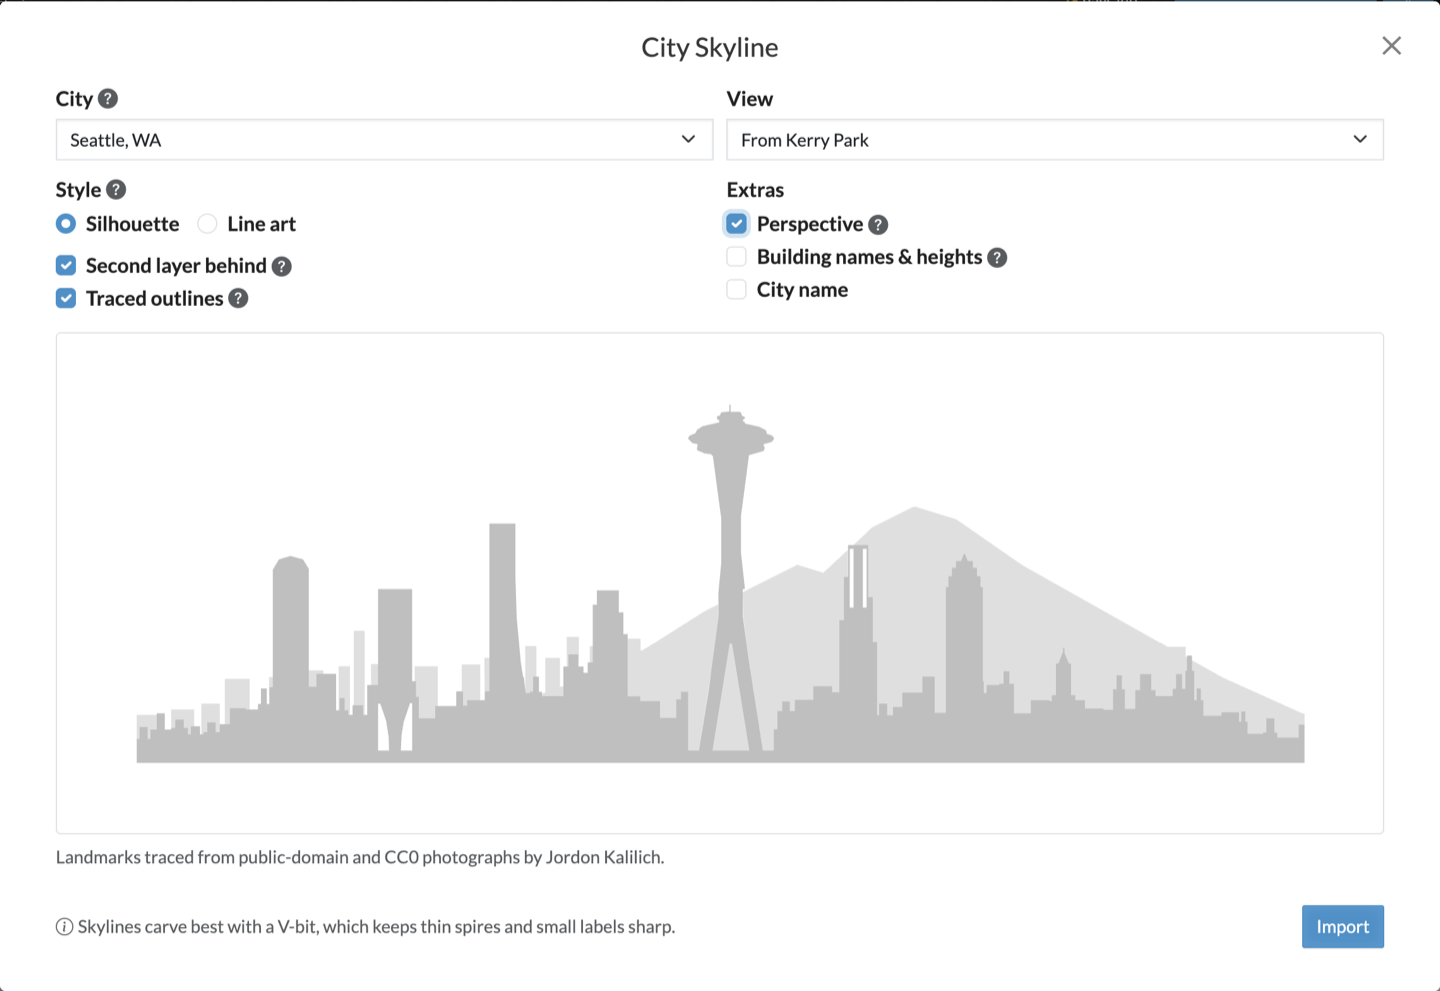
Choose a City and a View. Each city has two to four views, like Chicago From the lake or Seattle From Kerry Park.
Turn on Building names & heights to label each landmark with its name and height, joined to its top by a line. Heights show in feet or meters to match your project's units. Turn on City name to add the name beneath the skyline.
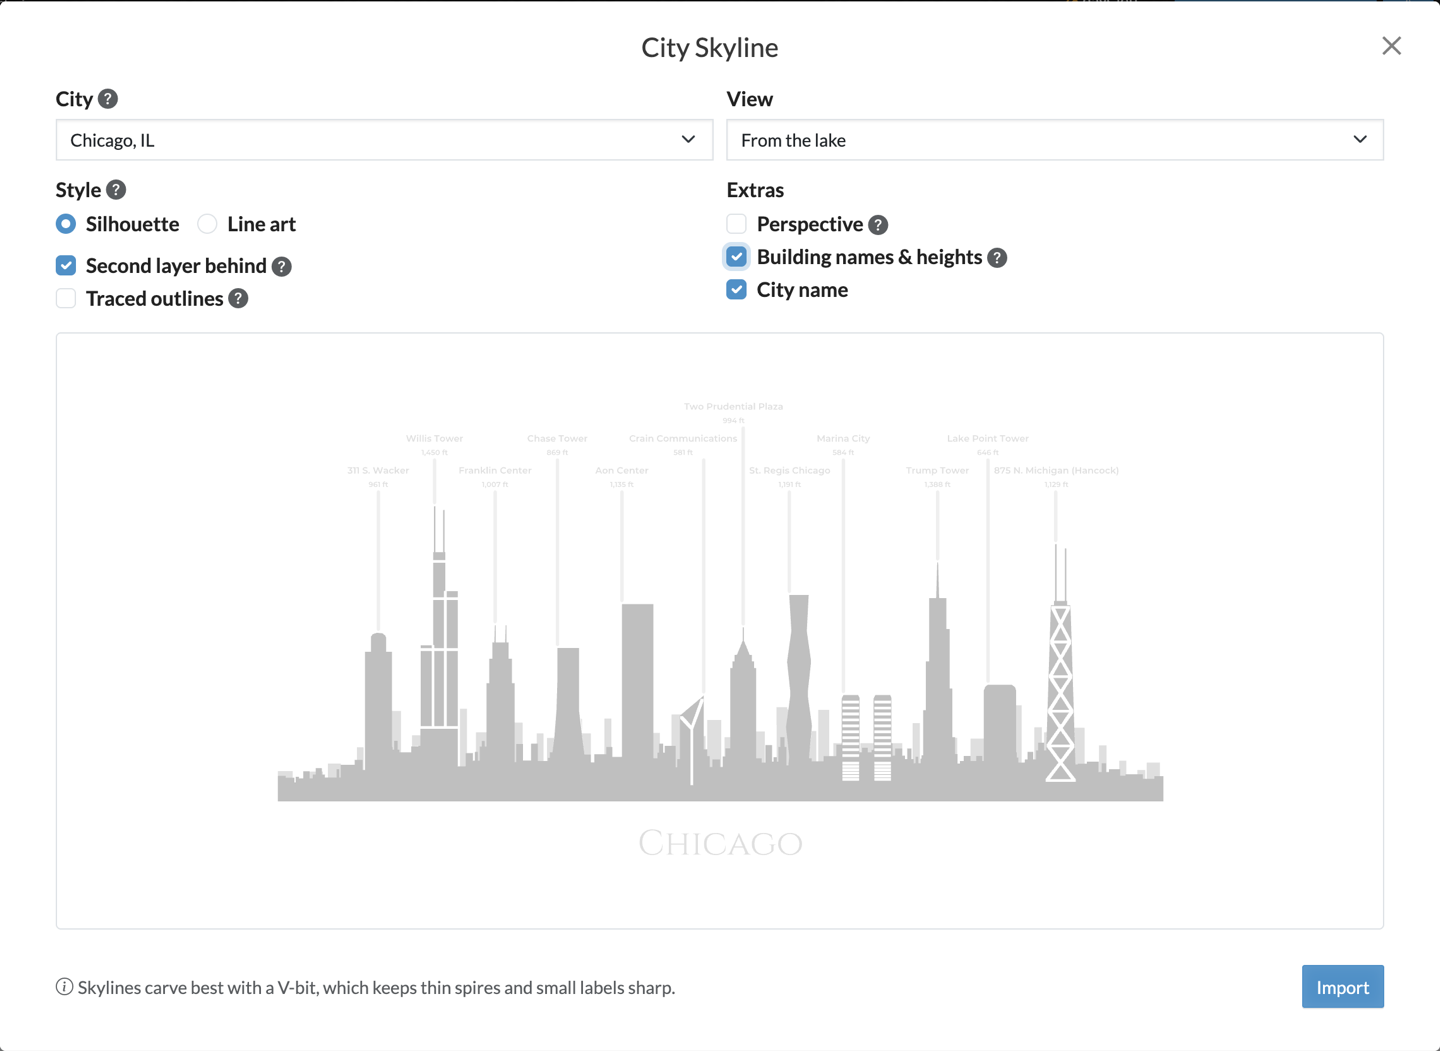
Choose a style
Silhouette carves the skyline as a filled shape, with the landmarks at 1/8" deep. Second layer behind adds a lighter row of buildings behind them at 1/16", and in some cities a mountain, like Mount Rainier behind Seattle.
Traced outlines swaps in landmark outlines traced from photographs, on views that have them. Perspective sizes each tower by its distance from the view, so nearby landmarks loom larger.
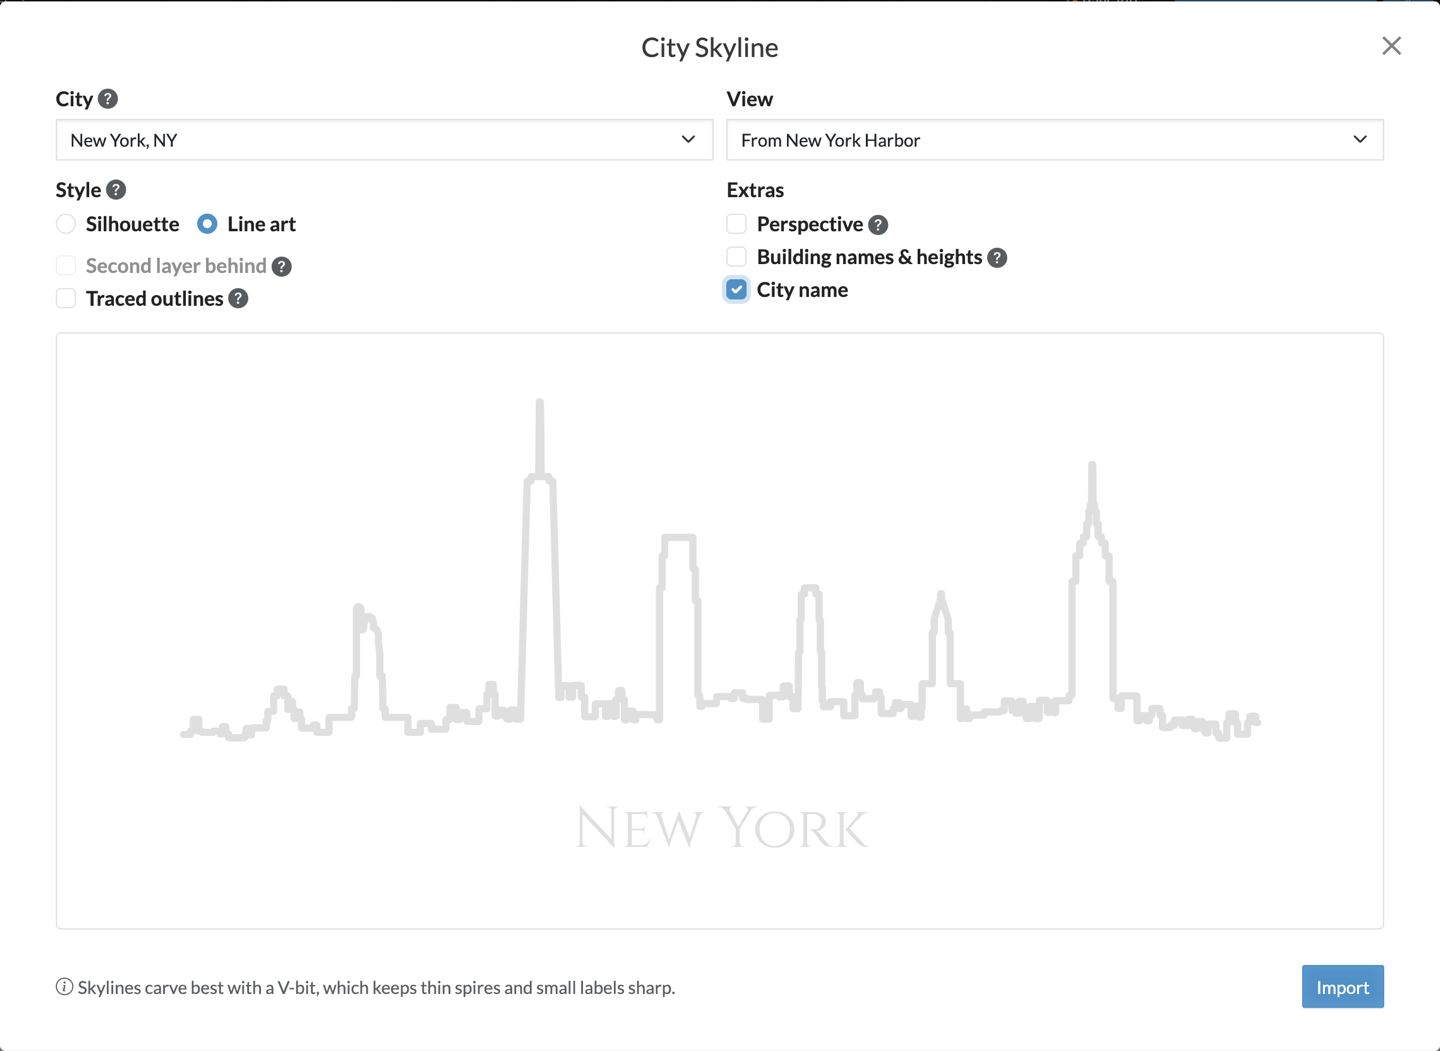
Line art engraves just the roofline as a single stroke.
Import and carve
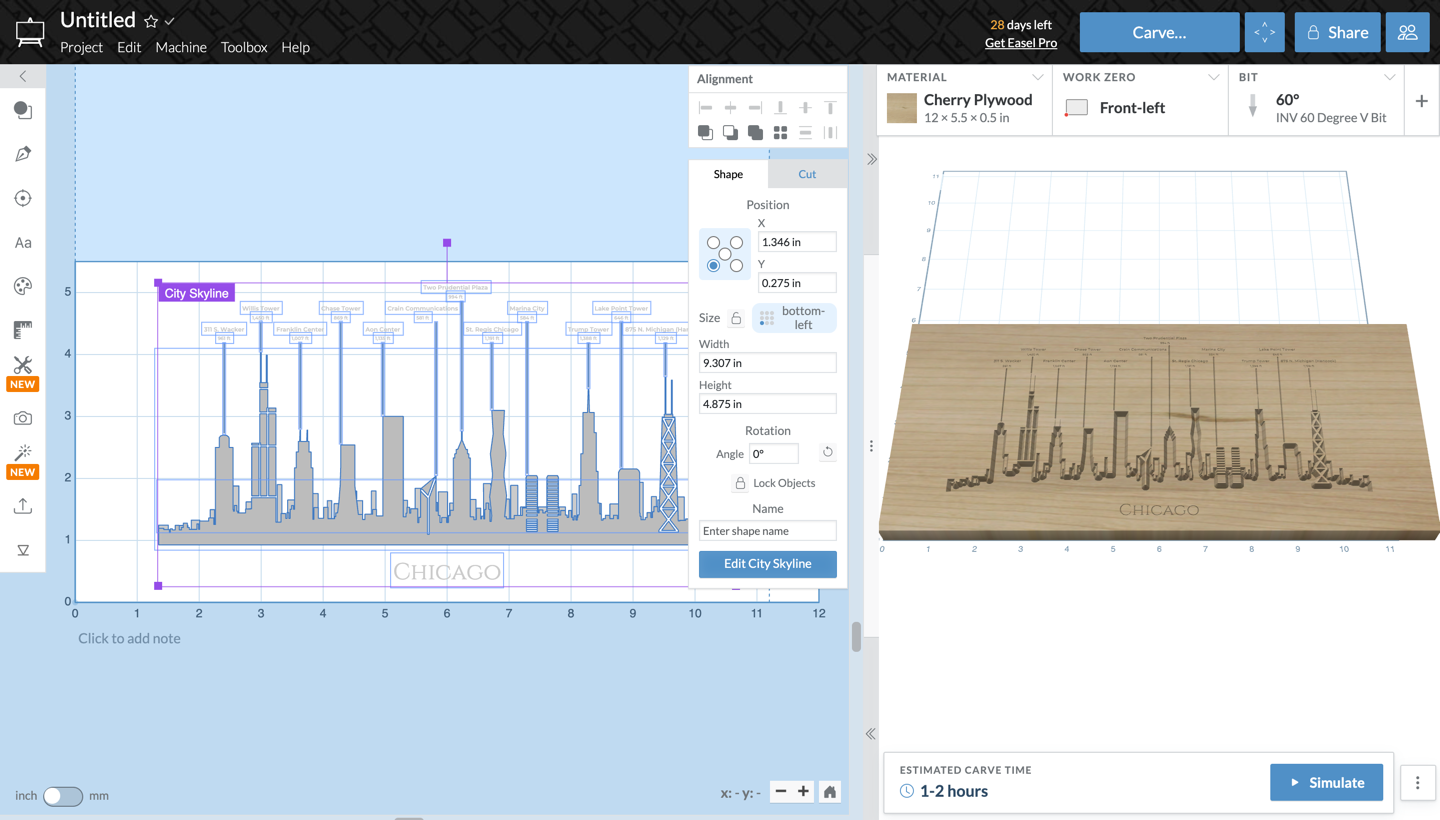
Click Import when the preview looks right. Skylines carve best with a V-bit, which keeps thin spires and small labels sharp.
To change a skyline after importing it, select it and click Edit City Skyline. The app reopens with the same choices, and Update replaces the skyline where you placed it.
Dice tray app
Design a dice box easily in a few clicks. The Dice Tray app lays out a tray and lid that can store your dice.
Open the app
Click Apps in the toolbar and choose Dice Tray, or find it in the App Library under Generators.

Select Hexagon or Shared well if you want individual pockets or a single row. Measure your largest dice or use the default for standard DnD dice to ensure your dice will fit.
Select additional options for hinges and/or magnets and ensure distances match your hardware.
Generate

Click Generate when the preview looks right and double check your hardware with the pre-existing measurement lines and carve!

Eraser
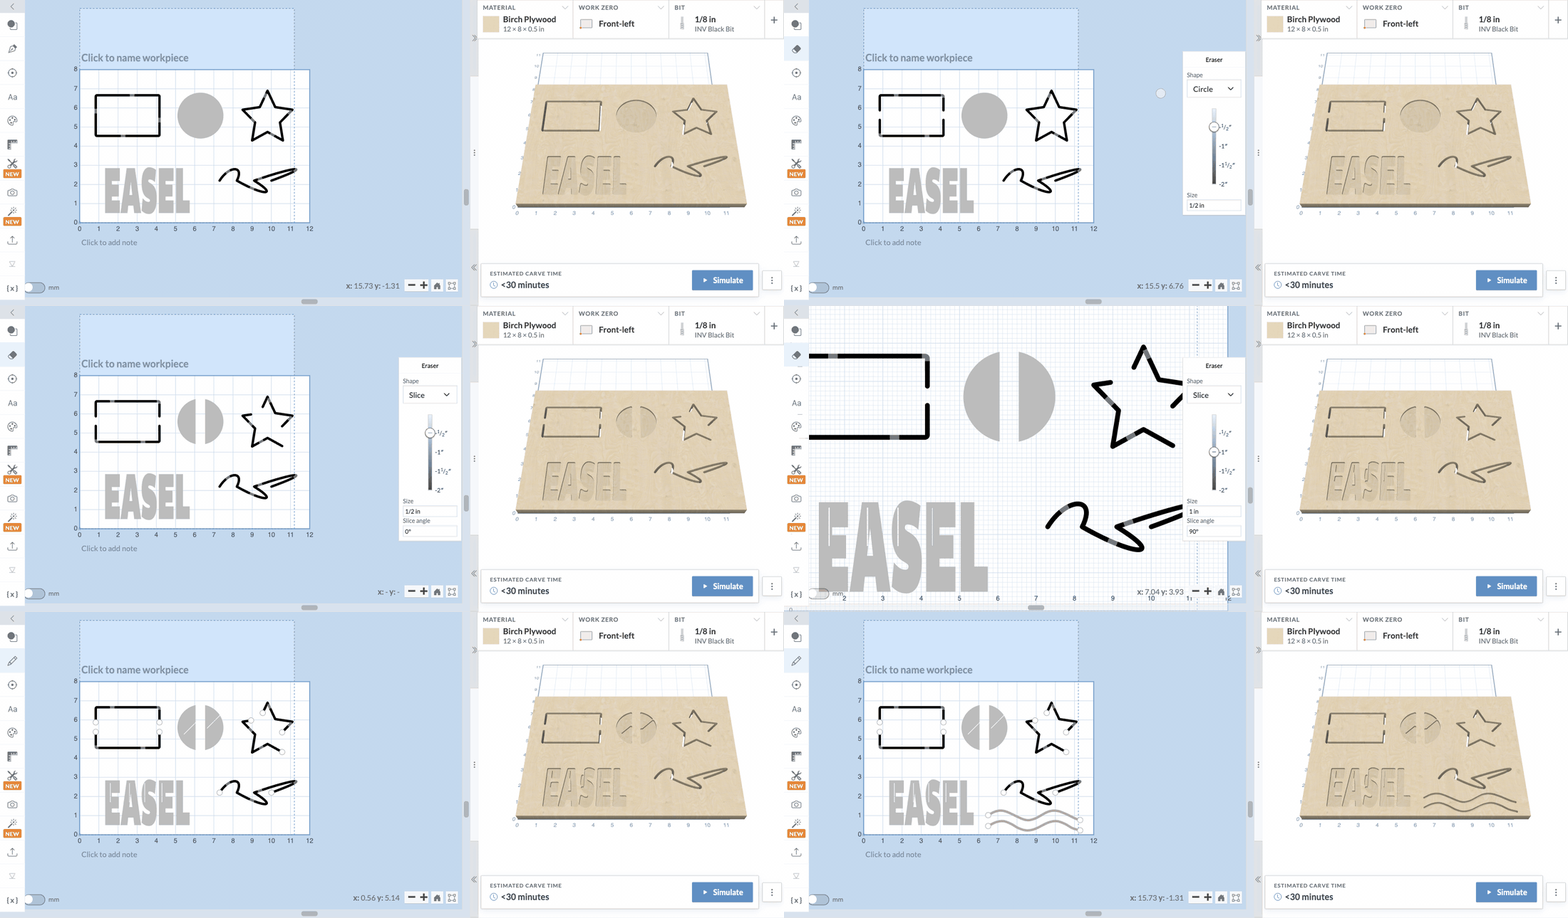
Clean up a design the way you would on paper. Pick the eraser, drag it across your shapes, and whatever it passes over is gone. No point editing, no helper shapes, no combining.
How to Use
- Open the pen tool menu in the left toolbar and choose Eraser at the bottom.
- Pick a Shape and a Size in the panel on the right.
- Click to erase a spot, or click and drag to erase along a stroke. The shaded area shows what will be removed before you let go.
- Keep going. The eraser stays on until you press Esc or pick another tool.
Each stroke is one step, so Undo puts back everything it removed.
What Gets Erased
The eraser treats a shape the way it will be carved.
- Outlines and lines lose the stretch of line you erase. Run the eraser across the edge of a rectangle and it opens up, the same as trimming a piece off with a knife.
- Pockets and text lose the area you erase. Drag through a filled circle and you get two half circles, each still a pocket.
- Inside and outside cuts keep the line your bit was already going to follow. The rest of the part still comes out to size.
Locked shapes, drill holes, and designs made by apps like Monogram and V-Carve Inlay are left alone.
Choosing a Shape and Size
The size starts at your bit's diameter, so a stroke removes about what one pass of the bit would carve. Slide it anywhere from 1/32" to 2", or type a size in inches or millimeters. The size stays the same when you zoom in or out.
When to Use Each
- Circle. Everyday cleanup. Works just like your pencil eraser.
- Square. Straight edges and sharp inside corners. Good for squaring off the end of a pocket or trimming a clean notch.
- Slice. A thin blade for cutting a shape into pieces. Set the Slice angle to the direction you want to cut, then click once across the shape. Zoom in to see the cut; it is only 1/32" wide.
Good to Know
- An erased shape becomes a regular path. Curves are kept as many short straight segments, and erased text can no longer be edited as text.
Give it a try on your next project, and let us know what you make with it.
New Workpiece Settings
Setting up your carve is now easier to follow. Easel's redesigned workpiece settings bar brings your material, work zero, bits, cut settings, and toolpath options into focused menus at the top of the editor.
Each button shows your current selection, so you can check the important parts of your setup without opening every menu.

Material setup in one place
Open the Material menu to choose your material and color, enter its width, length, and thickness, and adjust additional options for layered and 3D materials.
The new layout groups related controls together, making it easier to confirm that the material in Easel matches the stock on your machine.

Clearer work zero and tiling controls
The Work Zero menu uses visual choices for selecting the front-left corner or center of your material.
For projects larger than your machine's work area, the same menu contains Easel's tiling controls. You can choose how many tiles to use, adjust their lengths and overlap, and see which tile is ready to carve.

Bits, cut settings, and toolpaths together
Each carving pass now has its own settings menu. Choose the bit, review feed rate, plunge rate, depth per pass, and spindle speed, then adjust toolpath options without moving between separate panels.
Easel also shows where the active cut settings came from—Easel's defaults, your saved settings, community settings, or values you entered manually. Bit photos, toolpath illustrations, and help tips make the available choices easier to identify.

The redesigned workpiece settings are available to everyone in Easel. Try them in your next project and let us know what you think.
Bonus: Easel Pro subscribers can now use the material center as the work zero in 3D workpieces.
Nest Shapes & Fill Material
Stop dragging parts around to save stock. Select your shapes and Easel packs them onto the material for you — or, with a single shape selected, fills the whole sheet with as many copies as will fit.
How it works
- Select the shapes you want to arrange. Two or more shapes gives you Nest; a single shape gives you Fill material with copies.
- Click the grid icon in the alignment toolbar.
- Set your spacing, edge margin, and rotation, then press Nest (or Fill).
- Look at the preview and the summary. Not happy with it? Change a setting and press Re-nest to try again — nothing on your canvas has moved yet.
- Press Done to apply the arrangement.

Nothing moves until you say so
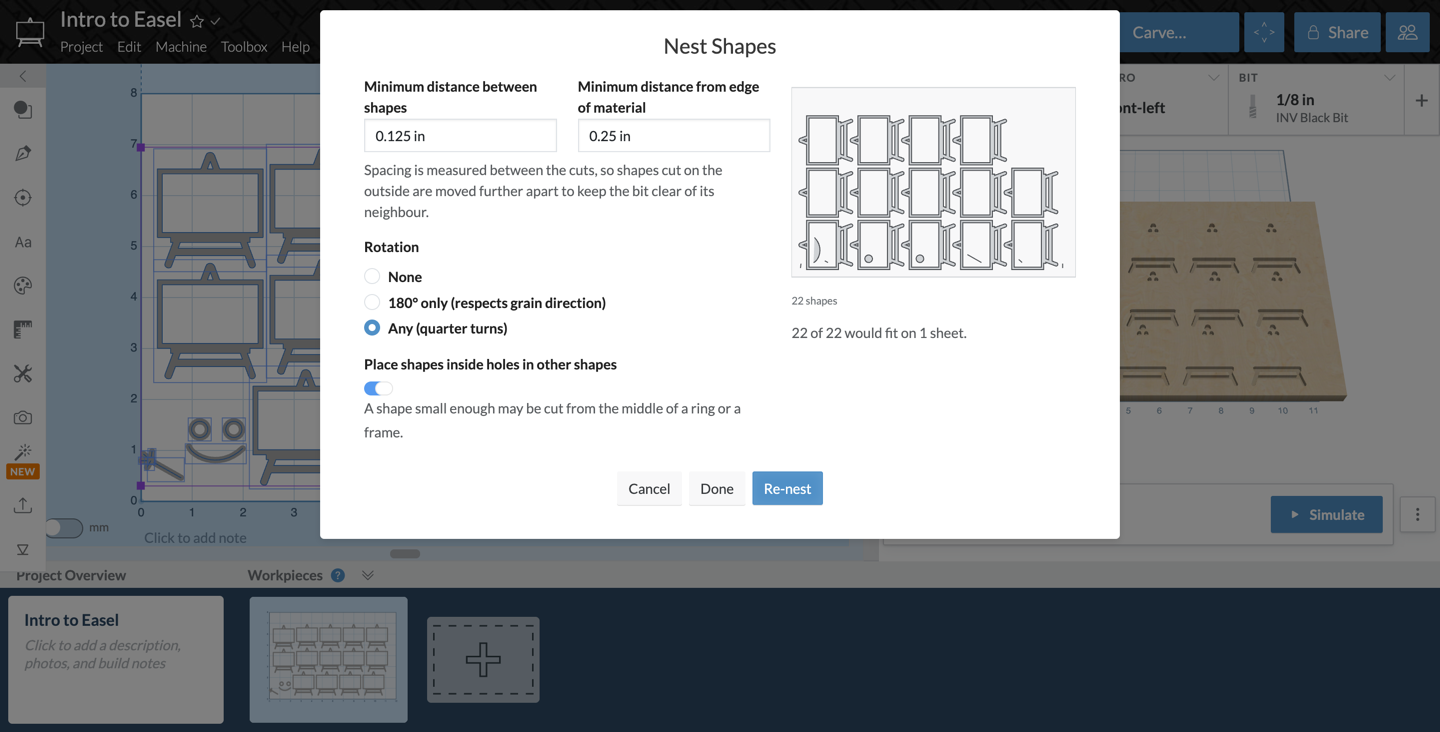
Every run is a proposal. Easel draws the plan on a preview of your material and tells you what it would do — "22 of 22 would fit on 1 sheet." — while your design sits untouched behind the dialog. Re-run it as many times as you like; each run reshuffles from a new starting point, so a second attempt often packs tighter than the first. Done is the only button that changes anything, and it lands as a single undo step.
Settings
- Minimum distance between shapes — the gap between cuts, not between outlines. Easel starts you at the width of your bit, since two cuts closer together than the bit is wide would run into each other. Shapes cut on the outside get pushed further apart automatically to keep the bit clear of its neighbor.
- Minimum distance from edge of material — keeps the cut off the very edge of the stock, where the material is least likely to be square and most likely to be under a clamp. Defaults to 1/4".
- Rotation — None keeps every shape exactly as you drew it. 180° only respects grain direction. Any allows quarter turns and generally packs the tightest.
- Place shapes inside holes in other shapes — a small part can be cut from the middle of a ring or a frame instead of wasting that space. Turn it off to leave the middle of a frame whole.
Fill the sheet with copies
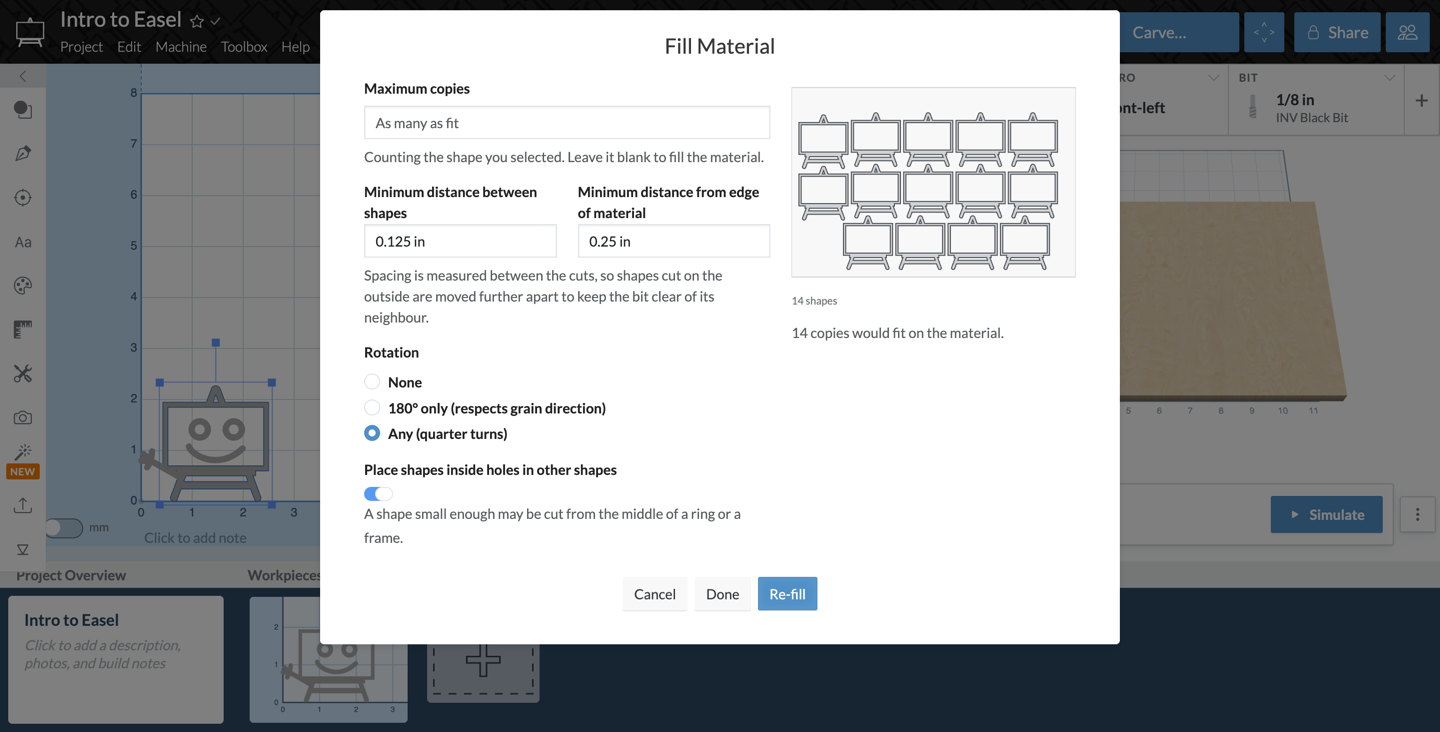
Select one shape and the dialog fills your material with copies of it instead. Leave Maximum copies blank to take whatever the sheet holds, or set a number when you only need a dozen:
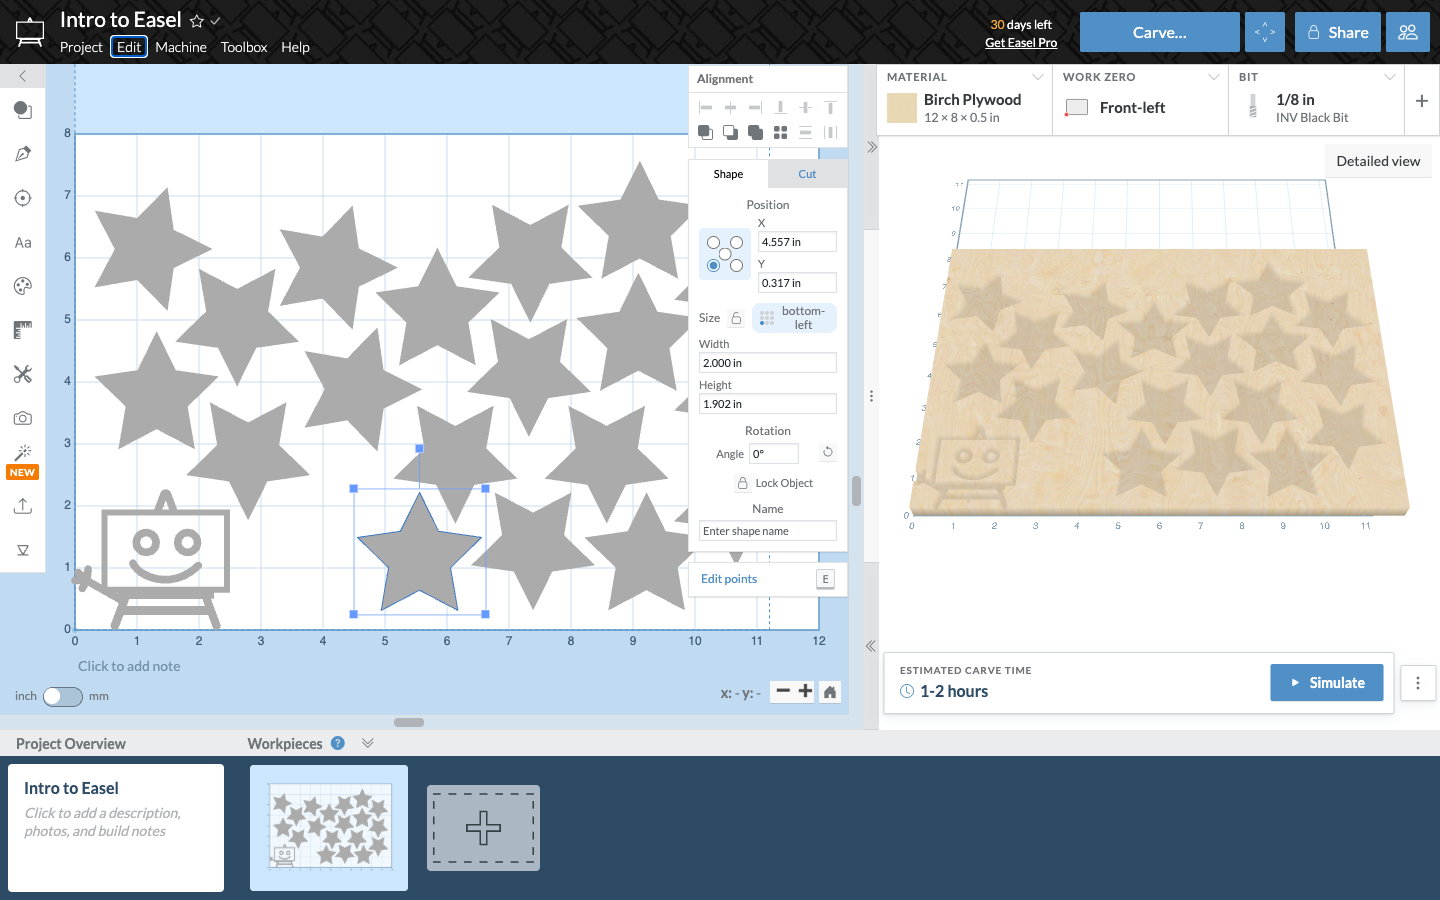
Press Done and the copies land on your canvas, packed around the shape that was already there:
When the parts don't fit
If the arrangement runs past one sheet, Easel keeps going onto a second and a third, and offers to Move overflow to new workpieces when you finish — each extra sheet becomes its own workpiece in your project, ready to carve. Turn that off and the extra sheets stay laid out beside your material so you can see the whole job at once.
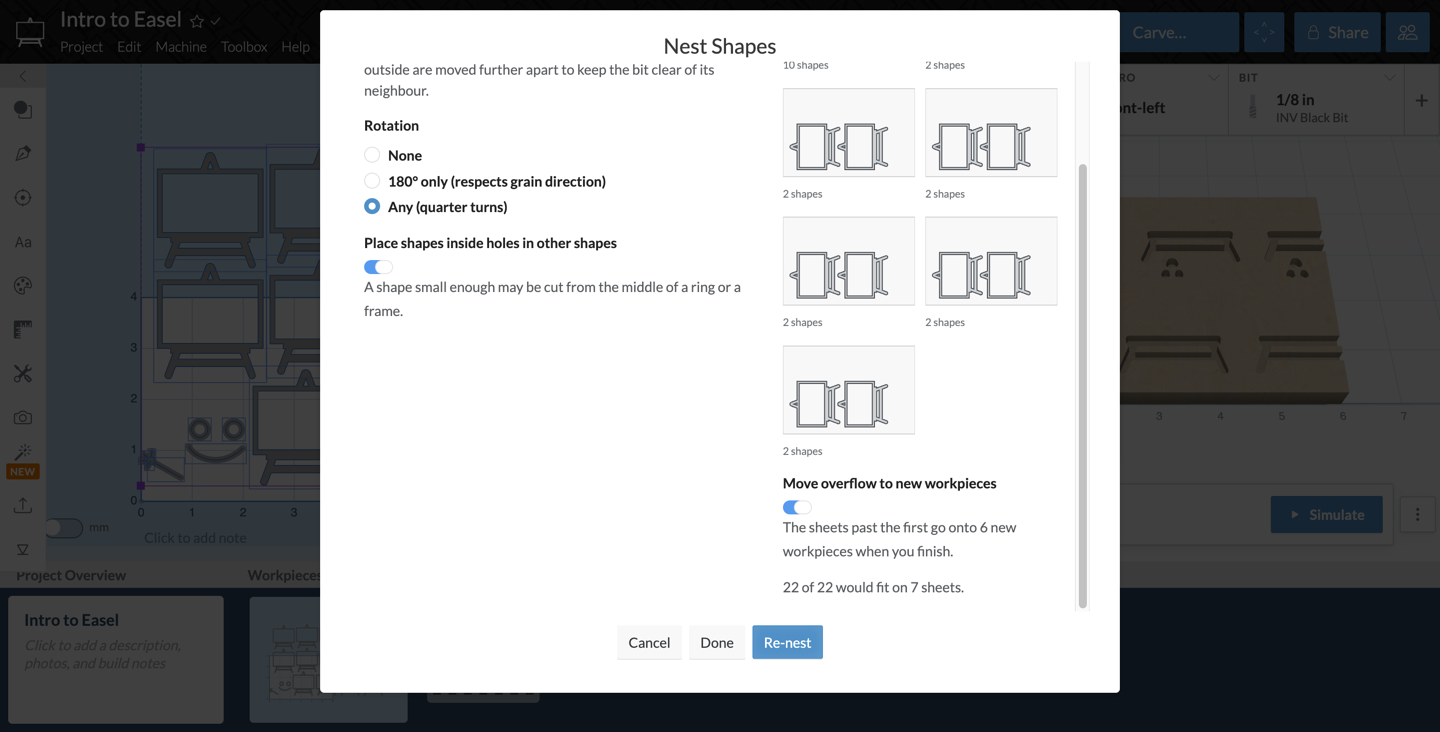
Shapes too big for the material are left where they are, and the summary says so rather than quietly dropping them.
Available with Easel Pro
Custom Material Appearance
Your custom materials now look like the stock you're actually cutting. Give any material in your Toolbox its own wood or metal texture, add a color tint, or set a solid or two-color plastic — and see it everywhere Easel draws that material.
Until now, every custom material you created borrowed a generic photograph of its category, so a shop full of custom stock all looked alike in the Toolbox and in the preview. Now each one carries its own appearance. Setting a custom material's appearance requires Easel Pro.
How it Works
- Open the Toolbox and go to the Materials tab.
- Click Add Materials and choose Custom to create a new material, or click an existing custom material to edit it.
- Choose a Material Type. The appearance controls change to match it.
- Pick a texture or a color (below), and watch the preview at the top of the form update as you go.
- Click Save. The name field suggests a name from your picks — "Walnut (Sage)", "Red / White Plastic" — until you type your own.
Wood and Metal: pick a texture, tint it if you like
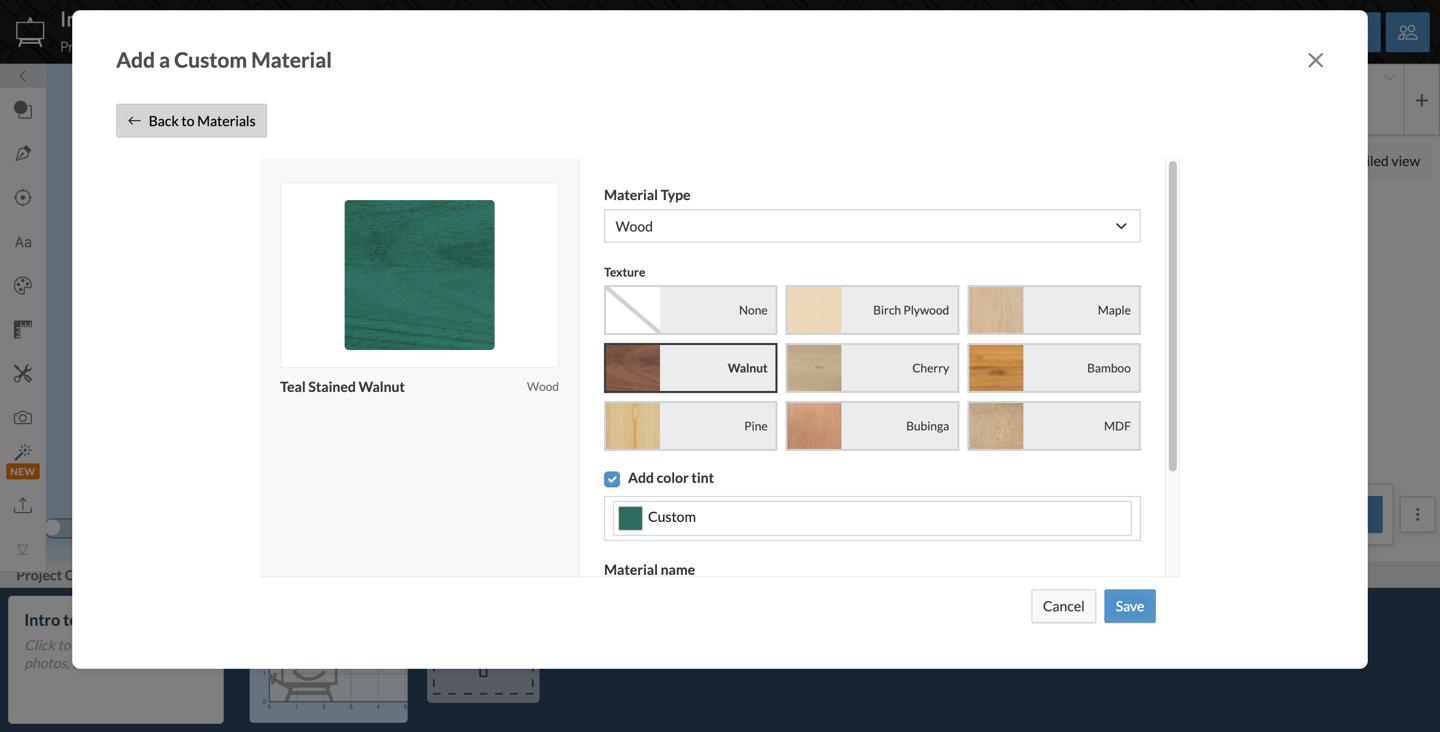
Wood and metal materials get a grid of textures — Birch Plywood, Maple, Walnut, Cherry, Bamboo, Pine, Bubinga, MDF, Aluminum, and Copper — plus None if you'd rather have a flat color.
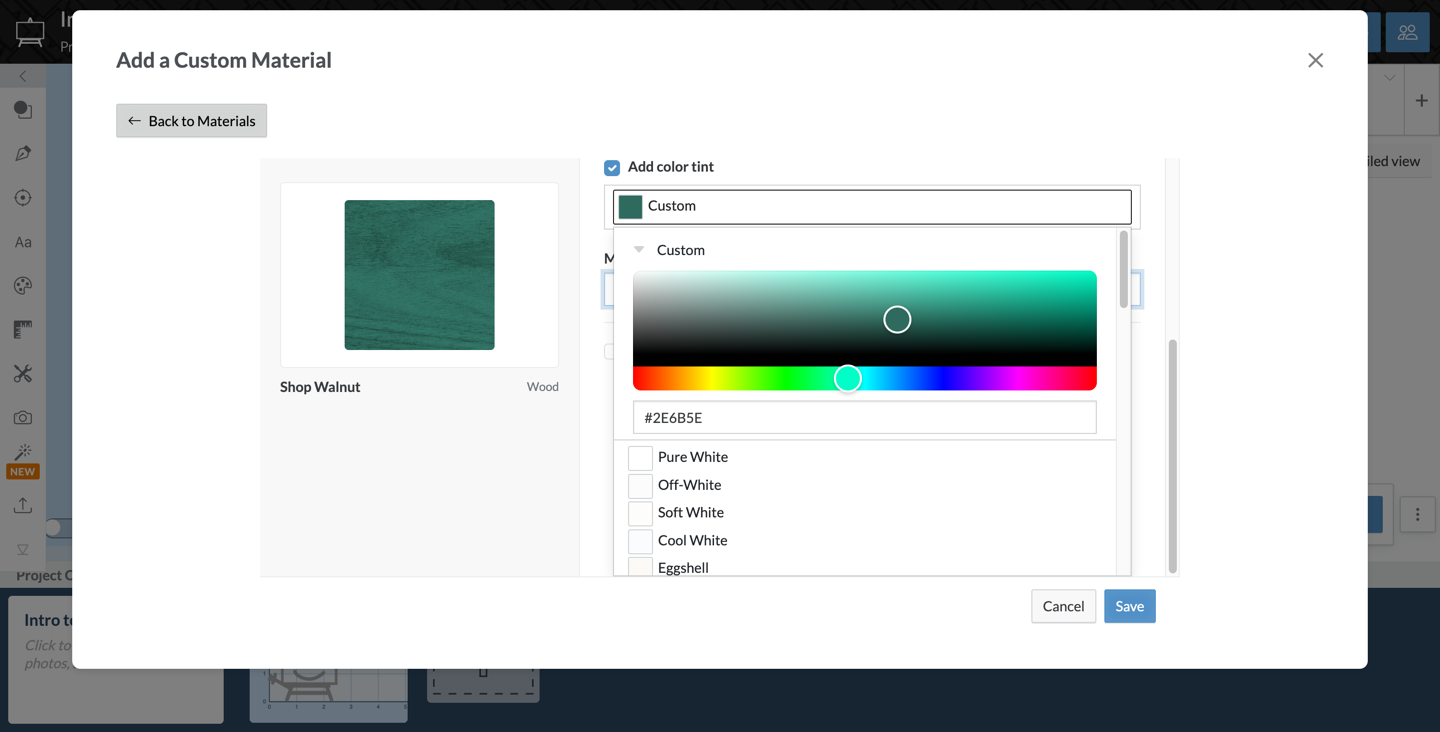
Check Add color tint to color the texture. The tint multiplies through the wood, so the grain and figure stay visible instead of being painted over — exactly what you get when you stain or dye real stock. Pick from the named paint palette or enter a hex value.
Plastics and everything else: Solid or Two-Color
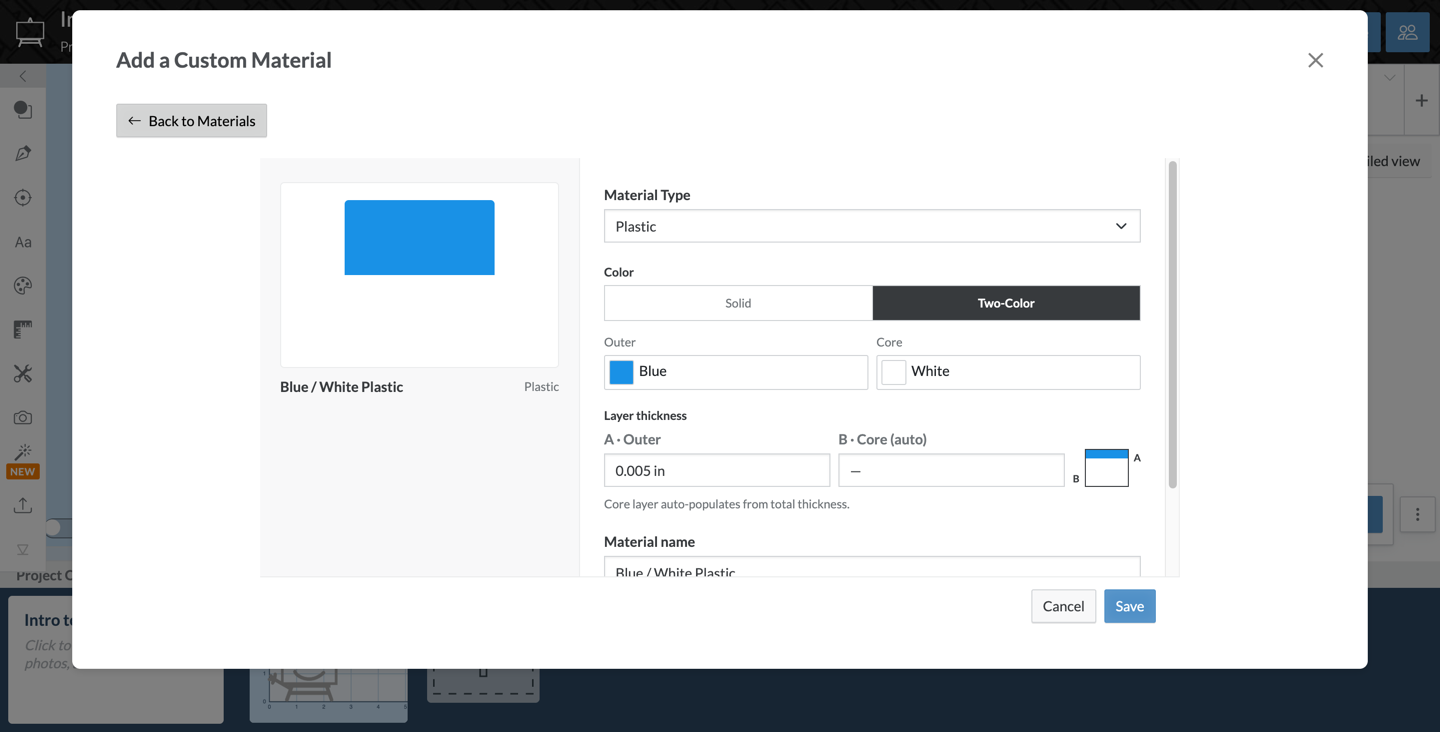
Other categories get a Solid / Two-Color switch instead.
- Solid is a single color.
- Two-Color takes an Outer and a Core color plus the outer layer's thickness. If the material has a total thickness, the core thickness fills in automatically, and a small diagram shows the stack.
It follows the material everywhere
The appearance you save isn't just a thumbnail. It's used by the Toolbox card, the material dropdown in the design view, the 2.5D preview, the 3D preview, and Wall Art — so a carve into your tinted walnut previews as tinted walnut, and a two-color plastic shows its core color at the right depth.
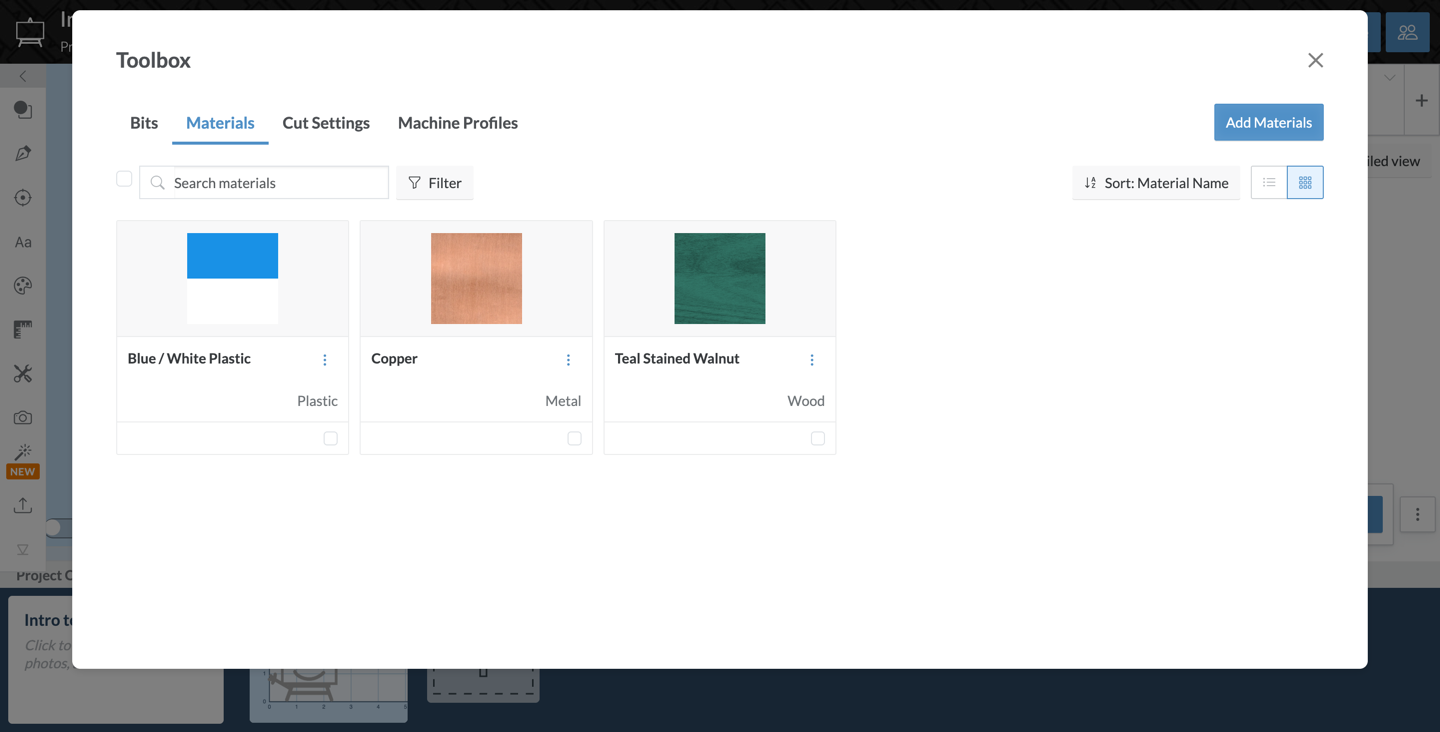
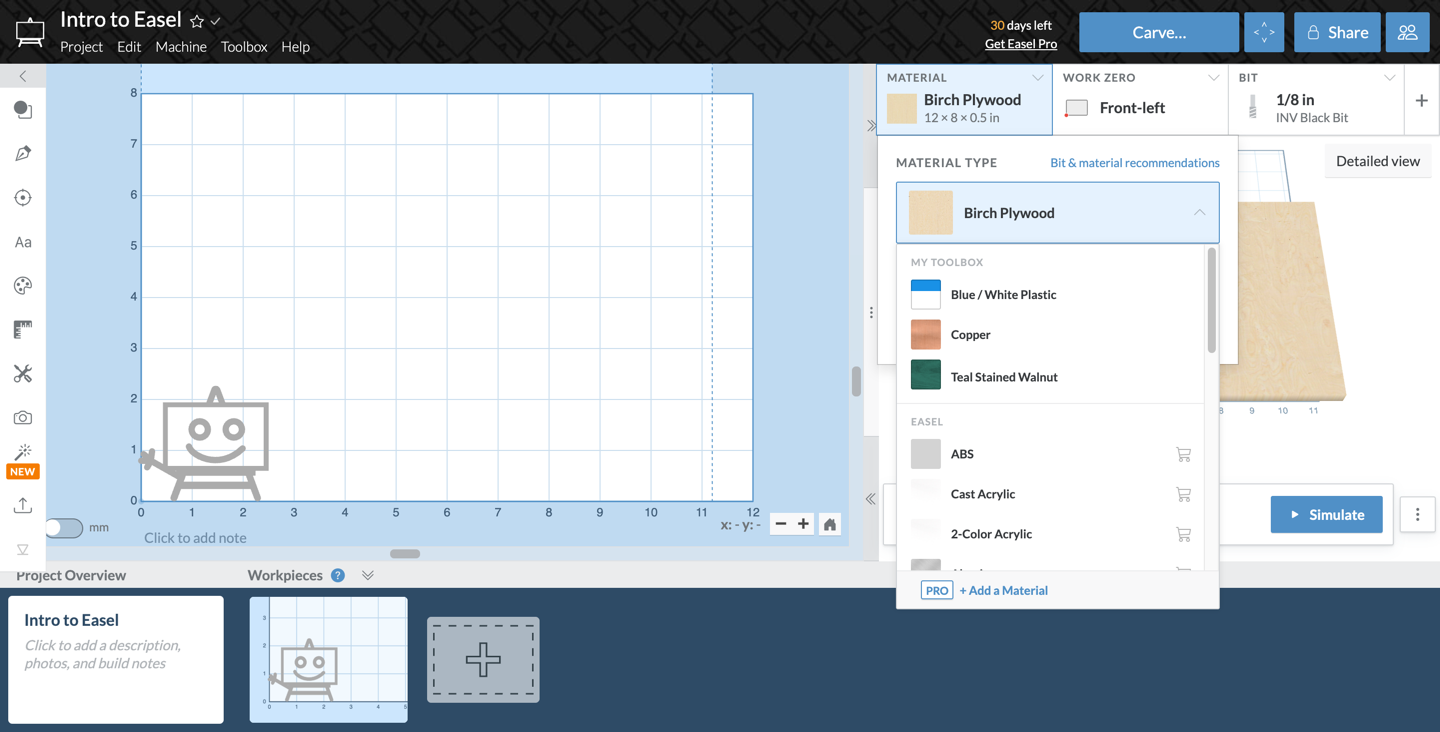
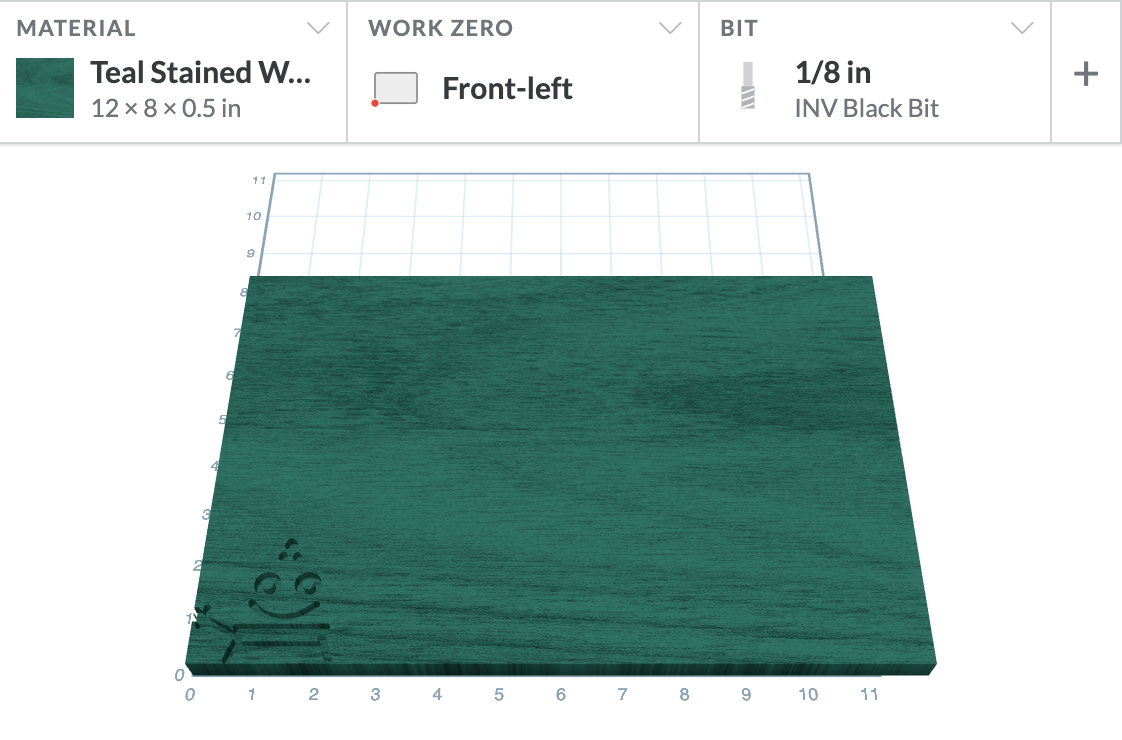
Change a material's appearance in the Toolbox and any open project using it updates right away, so you can dial in a color against a real carve instead of guessing.
Easel Generate Session History
You can now see previous generations and iterate on any previous generation in a single Easel Generate session.
If an iteration doesn't go the way you want you can easily return to the previous base to try with a modified prompt, or take it in a completely different direction.
To go back:
- Click on a previous generation in the sidebar
- Enter a new prompt to refine from there.

Navigating branches
If there is more than one branch at a given point, you can click the directions dropdown to see the options.
Selecting one will show you the whole chain from that point. The number to the right indicates the number of iterations that branch has.

Outline Shapes
You can now quickly create outlines of shapes or groups in Easel!
How to Use
There are two ways to outline shapes:
- Right-click on a shape, and then select the "Outline" option. (You can also right-click with multiple shapes selected.)
- With one or more shapes selected, choose "Outline" from the Edit menu.
From Right-click Menu

From Edit Menu

After selecting the Outline action, a window will appear letting you choose the outline mode and gap size.
Outline Modes
The outline tool supports two modes:
- Shrink wrap: The default. This mode follows all the contours of the shapes. It also supports a gap size setting to limit the size of the contours and internal corners that the outline will follow
- Rubber band: Imagine wrapping a rubber band around your selection of shapes.
Shrink Wrap, no Gap (default)

Shrink Wrap, with limited gap

Rubber band

August 2026
Continuous Raster Pass for 3D Carves
3D finishing passes now have a Raster Order setting. Choose Sections to keep the machine cutting with as few lifts as possible, or Continuous to sweep each raster line across the whole model before starting the next.
Sections is the order Easel has always used, and it stays the default. It carves whatever stretch of surface is in front of the bit, comes back for the rest later, and keeps travel short. On models with pockets, holes, or a cutout around the edge, that means the surface gets finished in patches — and where two patches meet at different times, the seam can catch the light.
Continuous trades a little time for a cleaner surface. Every line is carved in full, left to right, then right to left on the way back, so the tool marks all run the same way across the entire model and there is nothing to see where sweeps meet.
How it Works
- Select your 3D workpiece and scroll to Finishing Toolpaths in the properties panel.
- Under Raster Order, pick Sections or Continuous.
- Generate toolpaths. Your choice is saved with the workpiece, so it carries over the next time you open the project.

Raster Order works alongside the raster angle above it. Set the angle to run with the grain and the order to Continuous, and the finishing pass will comb the whole surface in one direction.
When to Use Each
Sections is the right choice most of the time, and especially on deep models, pockets, and cutouts where the bit would otherwise have to lift and cross open air on every pass.

Continuous is worth the extra time on flat-ish reliefs and signs — anything where the finished surface is the point and a visible seam would show. Watch the estimated carve time when you switch: on models with a lot of full-depth waste to cross, Continuous can add real time to the finishing pass.

Reach Out
Carve something with it and let us know how the surface came out. We'd love to see it.